| 12/5/2000 | Serious work was done today in the sanding operation. What is sobering is that I've only just scratched the surface, (pun intended) in preparing the airplane for cover. The tail surfaces have been finished, with a coat of varnish. Working on these three pieces in hopes to cover them in the next week. Just to have something new and different to do. | 1 |
| 12/8/2000 | Pulled the ailerons today, and spent an hour or so sanding them in preparation for varnishing. Pieces were blown off to remove dust, and then varnished. Considering the time it took to varnish these two, small pieces, The wings have got to be a very large and time consuming project. May again consider the application o f the varnish with a paint spray gun. | 3 |
| 12/10/2000 | Today, I painted. about 80% of one wing panel was covered. A 1" modeling brush and a lot of patience. Tomorrow, more of the same. | 3 |
| 12/11/2000 | Today, I painted. Sound familiar? Lower left wing was completed, as well was the sanding and painting of the lower right wing. | 5 |
| 12/13/2000 | Today, I painted. . . . . Inside right side of the aft fuselage area was painted today. Top right wing panel was sanded and painting begun. | 2 |
| 12/19/2000 | Today, I painted. Further painting of the inside of the fuselage, and also varnished the entire top right wing. One more to go! | 4 |
| 12/20/2000 | The upper left wing panel was placed on the table and sanded. A few joints were re glued to my satisfaction, and the painting began. about 50% done, I ran out of time and paint. Will pick up where I left off tomorrow. | 4 |
| 12/21/2000 | The upper left wing varnishing was completed today. Nothing left but some light sanding and then it's time to cover! | 1 |
| 12/22/2000 | The fun has begun! Just for fun, I prepared one of the ailerons and slapped some fabric on it! Looks real good. I'm a bit rusty, since it's been nearly 4 years since I have done any fabric work. but Will do some more reading, and by the time I'm finished my skill will have caught up! A little late I know. | 1 |
| 12/26/2000 | Gave the covered aileron a coat of Poly Brush Remaining aileron was sanded and covered. May cover a few tail surfaces tomorrow. | 2 |
| 12/27/2000 | To make opening up the poly brush can a bit more worth while, I Prepared and covered the stabilizer and Elevator. If I can get any work done tomorrow, I'll apply poly brush to all covered pieces. It may then be a good time to practice a few rib stitches. | 3 |
| 12/31/2000 | Finally beat my way through the snow to the garage today, and got something done. The final day of the year 2000! Today I poly brushed the Elevator, stab, and right aileron. 1/4" reinforcement tape was applied to all rib caps of the ailerons and tail surfaces. Time to watch the rib stitching video! | 1 |
Happy New Year!
Just thought I ought to start a new section here, since it is a new
year!
Work was progressing with disappointing slowness. Demands of
the holidays, and work have been taking me away from the work
As I tell everybody, I still try to do something every day no matter
how small it may seem, just not let the work stop.
| 1/4/2001 | A new skill for a new year. Having used fabric before I am prepared for most of the process. However, when mechanical attachment of the fabric in the past, I've always used rivets. Today I learned stitching! With needle, cord, aileron, and VCR remote in hand, I worked watching the Stits covering video, with Ray Stits demonstrating the work. Today I've stitched both ailerons. | 1 |
|
1/23/2001 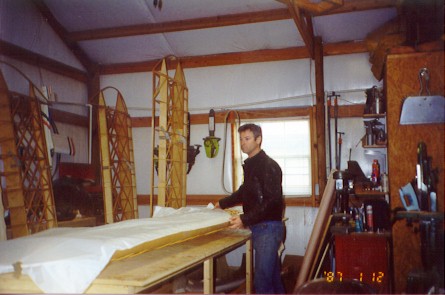 |
Stretching fabric again! It's been a while, but I covered the top left wing today. Fabric was applied to both sides. One piece each side, from root to tip. When ironed at 350 degrees, I found no deformation anywhere on the frame. May get out some poly brush in the morning. |
2 |
|
1/26/2001 |
Busy day today! I cleaned up the belly of the fuse and spread fabric on it. Also covered was one side of the rudder. I then applied the first coat of poly brush to the top left wing. Internal fuselage items (seat belt attach, fair leads etc. . .) were given their final bolts and screws before covering. |
3 |
| 1/27/2001 | Put the last of the fabric on the rudder. An area of the aileron bay was reinforced to protect against damage while shrinking the fabric. The tip right wing was brought to the table and sanded in preparation for covering. May be able to cover it tomorrow. | 2 |
| 1/29/2001 | Covered and shrank the top right wing today. Went fairly smoothly having covered the same curves on the other top wing. | 2 |
| 1/30/2001 | Applied the first coat of poly brush to the top right wing today as well as the rudder. Then the lower right wing was placed on the table to be prepped for covering. All aileron internal workings were installed with final bolts. Operation was checked for smoothness. Tomorrow aileron will be removed and fabric applied to the wing surface. | 2 |
| 1/31/2001 | Been a busy day. Covered both lower wings! Laid down a good bed of glue on the wing walk area to prevent any movement thus wear over the years. Had to saturate the surface with MEK to be able to squeegee the area. Need to poly brush the two wings, then start the rib stitching! | 5 |
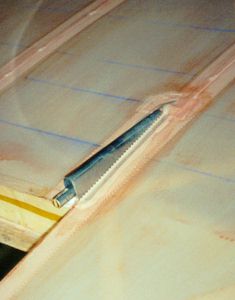
| 2/1/2001 | Lower two wing panels were coated with their first coat of poly brush. I then applied reinforcement tape to one of the upper wing panels. Then all rib stitch locations were marked, and one rib stitched. I'm sure I'll eventually get the speed into the stitch, but at present, I feel rather slow. | 3 |
| 2/2/2001 | Today I achieved a proficiency at an age old art. In a matter of 5 hours, I was able to reinforcement tape, measure, punch, and stitch two wing panels. Once you get a feel for the stitch, it all happens pretty quick. Those building a Youngster or an aircraft with a 42" cord, using a 3 1/2" spaced stitch, will be happy to know that it takes 15' of cord per rib. Things are moving faster than I had anticipated, so I'm going to have to make a quick order for fabric and paint! | 5 |
| 2/3/2001 | One more wing down. Stitch is becoming second nature, found new technique to keep the stitch tight while cinching down the knot. One more wing and a few tail surfaces. | 2 |
| 2/5/2001 | Only had half a day, but the only thing left to stitch, is the fin. Today I stitched the elevator, stabilizer, rudder, and lower right wing. Need to finish up a few details on the fuse and get some fabric so I can cover the fuse sides. | 3 |
|
2/8/2001 |
Quickly running out of materials! Preparing fuse for covering the sides. Final installation of seat belt anchor nuts were made. Interior of the fuselage was given its fist coat of varnish, as were the rudder pedals and heel runners. Finish tape was applied to ailerons and elevators. |
4 |
| 2/9/2001 | Interior, rudder pedals and runners were varnished today. Preparations were made to the brake mechanics for final installation of the rudder pedals. Shoulder harnesses were installed at seat back. Lap belts will be installed tomorrow. | 3 |
| 2/10/2001 | Rudder floor runners, pedals, and cables were installed in final flight configuration. The seat bottom was varnished and will be installed tomorrow. Instrument panel was installed to allow wiring chores to begin. Next work session is to continue the application of finish tapes. | 2 |
| 2/11/2001 | All remaining reinforcement tapes on the wings, were painted with poly brush in preparations for taping. The rudder and stabilizer had finish tapes applied to their stitches. 3" bias tape will be applied to their leading edges at a later date. | 2 |
| 2/12/2001 | Spent a bit of time applying bias tape to the elevators, stabilizer, and rudder today. | 1 |
| 2/13/2001 | Tape worm! Seems I never have all the right tapes! Now in need of some 3" tape for the leading edges. Other than that, One of the upper wing panels is completely taped up. Started on the second. Time was spent cleaning up the tail feathers tape work. They are pretty much ready to apply poly spray at this point. | 3 |
| 2/14/2001 | Having to run errands, stole some time today. Finished the other top wing, and got about 80% through the bottom right wing. should be no problem finishing up the two wings tomorrow. Then again, I have to work on the 180 and the Sonerai I. Always something. | 3 |
2/15/2001
 |
Well all four wing panels have been fully taped except for the leading edge tape that I haven't yet got in stock. Just as in rib stitching, once you really start to feel competent at the process, you're done!? If time is found tomorrow, placement of inspection rings, creation of aileron pushrod fairings, etc. Fuselage fabric is the only major task remaining. | 3 |
2/16/2001
 |
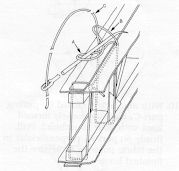
Fashioned fairings for the aileron pushrods where they leave the wing and attach to the aileron horns. I used some scrap .016 aluminum for this purpose, and glued and taped it to the wing skin. I also placed 8 inspection rings on the lower wings, (four on each) Have to study where I want to place some on the top wings. | 2 |
| 2/20/2001 | Got some supplies in today, and returned to the work. Preparing places to suspend the wings from the ceiling and or walls for spraying the poly brush and spray. Put leading edge tape on all four wings. Will spend time with the iron tomorrow smoothing all edges. | 1 |
| 2/21/2001 | Been a busy day. With the reception of the materials yesterday, I spent all day long using them up! Today I covered the fuselage sides, top, painted the first coat of poly brush, and taped the entire left hand side of the fuselage. The Fin was also covered and I'll put a few stitches in it tomorrow. | 6 |
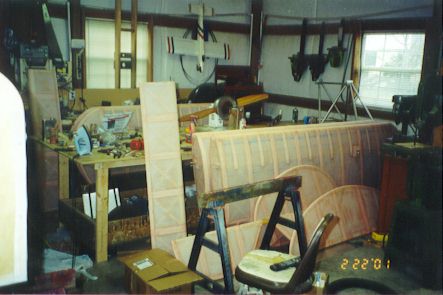
2/22/2001
 |
Taping is complete! Will set up stands to suspend wings and tail surfaces to allow the spraying of paint. Any leftover spare time tomorrow, will be spent cleaning and making room. | 3 |
| 2/24/2001 | Spent an hour or so ironing down the pinked edges on the fuselage, in preparation for the first spray coat of poly brush. I gave the top, and sides a coat, and will leave the belly to my next work period. | 3 |
Painting!
Now starts the endless layers of poly brush, and poly spray
| 2/26/2001 | Today I entered the next phase of covering. Painting. Today I finished the application of Poly Brush on the fuse and one wing. I also Applied two good coats of Poly spray to the fuselage. It's amazing just how many pinked edge corners seems to stand up from nowhere when you put that first coat of Poly Spray on! I think something that would help here would be to put at least a second coat of poly brush down on the fabric before applying the finishing tapes. Tomorrow I should finish the application of Poly Spray to the fuselage, and maybe the one wing. I then will start on the remaining wings. | 3 |
| 2/27/2001 | Applied the final coats of Poly Spray to the fuselage. Lower right wing requires a final coat of Poly Spray. The bottom left wing was prepared and given a initial brush coat to the finish tape using a brush. ailerons and rudder were also prepared for a spray coat of poly spray. | 3 |
| 2/28/2001 | Too cold, and too rainy. I did get out and iron a wing's tapes down, as well as an aileron and rudder. I sprayed one coat of poly brush on one side of that wing, aileron, and rudder. May get the other side tomorrow. | 1 |
| 3/1/2001 | Shot the other side of the bottom left wing with poly brush, as well as the other sides of the aileron and rudder. First coat of Poly spray was placed on the top of the bottom right wing, aileron, and rudder. Final coat was also placed on the top of the bottom right wing. | 1 |
| 3/2/2001 | Two lower wings are complete as for the silver. Lower left, aileron, and rudder are complete also. Top left wing was started and completed today through the silver. Remaining items are the upper right wing, stabilizer, and elevator. | 3 |
| 3/3/2001 | Not much time available today. Prepared stabilizer, elevator, and aileron for first coat of poly brush. | 1 |
| 3/7/2001 | Prepared the bottom of the remaining top wing for poly brush and spray. Stabilizer elevator, and remaining aileron are also being prepared. | 2 |
| 3/8/2001 | Spent the day finishing up the silver work. Now in the next few days I should be able to start shooting the Base white color on the fuselage. Once I get the fuse painted, I can put it back on the gear so I can move the thing out of the way! | 3 |
| 3/10/2001 | Today I opened a can of insignia white left over from my Sonerai "I" construction. With this I covered the entire aircraft with one coat to give a good start covering up the sliver. It also gives you a real good look at any flaws that may have been missed against the dark silver. This will allow the final colors to go on a bit more brilliantly. A lot of time was spent cleaning, sanding, and running a tack rag over the structure. Can't wait to start spraying the final colors! | 4 |
Final Colors!
The most exciting part of it all! Trying to come up with a paint job
that you won't get tired of, or one that you've seen on every other airplane
on the ramp.
I have to admit, that I did see a similar design on another aircraft,
but It was new to me, and I definitely hadn't seen it on a biplane.
It was a bit more effort than I'd like to put into an airplane that I really
wanted finished, but in hind site, I'm glad I spent the time.
| 3/11/2001 | Ok, I'm excited now! Shot two pots of Paint today of the final base color. I know it was pouring down rain and 60 degrees outside the door, but I couldn't help myself. Using the 8500 reducer with about an ounce of blush retarder, I'm getting a really nice shinny finish. Going to have to restrain myself to go ahead and get all the base color shot before I start the trim colors. Afraid it would waist both time and material, doing it piece meal. | 2 |
| 3/12/2001 | Paint flying everywhere! Shot about 1.5 gallons of PolyTone paint today. Everything is covered to the finish coat. Running out of places to place things while drying. Spent some time laying out the paint scheme (risky scheme as Al would say) on the drawings. When the paint is fully dried, I'll start transferring the sketches to the bird it self. | 3 |
| 3/14/2001 | Had a bit of time today to tape off the fuse trim pattern. Trim was then highlighted with Gold paint, final trim color will be sprayed tomorrow. | 2 |
| 3/15/2001 | Today I finished the trim paint of the Fuselage. Yes there is a bit of touch up to do on the base color, but I'm satisfied with the outcome. May try to get a few of the wings and horizontal tail feathers painted tomorrow. | 4 |
| 3/16/2001 | Except a little touch up of overspray, and masking bleed, I'm finished painting the fabric and wood surfaces of this bird. I will have to find some matching paint for the cowling, landing gear and inspection plates. All will wait till after the engine is installed. | 5 |
| 4/7/2001 | After fitting all metal pieces to the fuse, they were all removed and cleaned in preparation for painting. Parts include, inspection plates, tail flying struts, Fin to Stab fairings, cabane struts, and interplane struts | 2 |
| 4/8/2001 | Spent the time touching up the fuse and tail section paint today. I'll know next time to NEVER put a stripe edge down the pinking of the finishing tapes! I don't care how good your masking tape is! | 2 |
| 4/9/2001 | Busy day. Painted all exposed aluminum to match the dark green color, except a small area on the gear legs to mimmic the pattern of the wings. Once dry, tail flying struts, were re-installed with final bolts. Rudder, and elevator controls were given proper Clevis pins, and cotter pins installed. Bolts that attach tail wheel spring were saftied into position. If nothing else, the tail section is now complete, and ready to fly. Amazing how stout the tail section gets with the flying struts in place. Cabane struts were also installed for the final time with proper nuts and bolts. Canopy bow was given several coats of paint before final installation of canopy bubble. All remaining overspray on the fuse, (to be fixed) was touched up. Hope to hear from the FAA soon, to define proper areas to place the N numbers. | 6 |
| 4/10/2001 | I obtained some gold Pinstripe tape and placed it on the Gear legs to mimmic that on the fuselage. Tape actually matches very well. | 1 |
4/11/2001
 |
Placed the "N" numbers on the airplane today.
Tried no less than 5 places, and found I liked none of them. Ended
up placing them just in front of, and slightly blow the stab leading edge.
For my own entertainment, I placed the fuse on scales, and see that it weighs around 143 pounds with out the wings. Weighing one upper wing panel, I can see that it has gained about 6 pounds from the varnish, fabric covering and paint. Adding the same 6 pounds to the other wings would give me a total of 78 pounds of wings and ailerons. Total then of 221 pounds (including tank). This includes everything except the engine, prop, fuel lines, and engine controls. Just might be on schedule to hit the target weight of 380. |
2 |